Thursday, February 22, 2024

Not Modern Enough to Use Modern Conveniences

This is for all of you out there using something other than your hands to raise and lower the presser foot on your sewing machines. 

knee lift rodsewing machine
I have two Bernina sewing machines and both have the option to insert a rod like this into that little hole on the front.  This view is on my 1001 model but my newer 350 model has it as well.  Both came with the knee lift rods.  The bend in the rod allows it to go under your table so you can "simply" press your knee against it and it will raise and lower your presser foot, hands free.  I say "simply" in quotes because I have no idea how simple it is to use. 

Confession:  I've had my Bernina 1001 for almost 30 years and a newer 350 but I've always been afraid to use the knee lift.  Why?  Two very silly reasons.  For one, I don't know how to use it and never bothered to look at a video.  But mostly because I've always been afraid that I'd get so used to it, I wouldn't ever be able to use a sewing machine that didn't have this option, no matter how good the rest of the options might be.  

Anyone else out there have this problem?  You have access to a modern convenience that will make your life so much better but you won't use it in case you love it and can't live without it?  I'm looking at you, backup cam in my car.  I refused to use it in case I become so reliant on it, I can't back up the old fashioned way.  This happens more than I'd like which is a great example of irony because the very crux of my job is technology and how it can be leveraged to improve things.

This must be a GenX problem, right?

Back to why I've called you all here.

The more I see people in their videos appearing to magically raise and lower presser feet without no hands, the more I wonder why on earth I have two machines that will do this and refuse to bother.  Isn't this the kind of thing I would LOVE?  I'm all about efficiency and surely the micro milliseconds I will save not moving my hand to raise and lower the presser foot will make my life so much better, right?  So I keep thinking, I should really figure this out.

sewing space
And I sat down to think about thinking about it and came up with a new dilemma.  How does the knee lift work if you have a standing desk?  When I upgraded my sewing space a few years ago, I left behind the old sit at a table thing and put in a counter where all of my machines live.  The 350 is missing from this picture but it sits to the left of the 1001 most of the time.  I stand or use the stool.  When I'm quilting or trying to sew something unwieldy like these grain bags, I bring it to a table so I can spread everything out.  At that table I do sit, but when I'm doing anything else, I'm at this counter.  I don't think I can stand and press the knee lift and the way I have everything arranged, I'm not sure I can sit on the stool and use it either.  I know I could just try it and see what happens but I also know that if I use it once and LOVE it and then find out I can't use it in my current set up, I'm going to be so mad and rethink everything about the set up I like so much.  

It's very complicated here in my brain when I'm having such first world dilemmas.

I'd love to hear from you if you use a knee lift system and especially if you use it with a standing desk or something similar to mine.  

Tuesday, February 13, 2024

Not Your Average Grain Bag

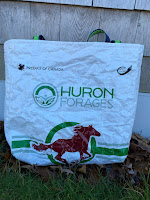
grain bags repurposed

A few years back, I learned how to make a bag from some kind of tutorial that had very specific dimensions in mind in the tutorial.  

One thing led to another, and I realized you can make any size you want, make it as deep and wide as you want, add handles, etc.  You can even add pockets inside or outside!  That one takes some pre-thinking and I won't tell you how many times I didn't pre-think correctly and have had weird pockets in weird places.

I did correctly pre-think on this one and successfully incorporated the whale into my design.  The inside pocket locations were questionable though.

I don't remember if the original had you make a lining, but it's as simple as making another bag with the same dimensions and then sewing the two together.  This hides all of the seams and you get that fun experience of "birthing the bag" where you pull it all through so everything is right side out. 

I made this tutorial to give everyone just a nugget of an idea.  Once you get the concept, you'll be off and running!

My  latest endeavor has been trying to find ways to upcycle grain bags from the barn.  We have all of these grain bags from the enormous amounts of grain they eat, and most just get thrown away.  I've seen a lot of people just wash them, cut them down a little bit, make handles from the parts they cut away and sell them as is.  

I tried that but I didn't like the result.  Too noisy and the handles were terrible.  I didn't really trust their durability.  I learned after making this bag with the fancy handles that webbing is really the best way to make durable straps for a bag.  They last forever and I've been known to upcycle from one bag to another.

 
Fast forward to my overactive brain thinking I should quilt some batting scraps to the back of the grain bags and then line them.  That quieted things down nicely and then I got creative with pockets and linings.
My favorite addition is this green fabric on the webbed straps.  Webbing comes in a variety of colors, but darker is really better if it's going to be a bag that might get dirty or used a lot.  The green in the brand name got me thinking and I found some fabric in my stash to match so I sewed it on top.
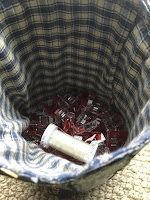
The fun didn't stop there.  From the scraps of leftover scraps, I made a little clip holder for my sewing room.
All of the bags (not my little clip holder) are available in my etsy shop.

Saturday, February 3, 2024

Winners All Around

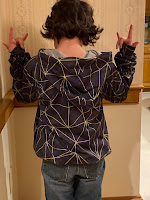
back view of a hoodie
A couple of months go, I won some "misprint" fabrics from Waymaker Fabrics.  They were hardly misprints.  Two of them seemed to have absolutely nothing wrong with them and one had a clear misprint but it was easy to work around.

Melvin's birthday is right after Christmas and while I found things to get him for Christmas, I was really stuck for something for his birthday.  I don't usually make clothes for other people, mostly because I don't think I'll get the size right or they will pull too hard and a seam will pop, but his mother has made some clothes for him, so I asked if there was a pattern she uses for a hoodie.  I figure you can't really go wrong with a hoodie.

She recommended the kids Classic Sweatshirt from Peek A Boo patterns.  I thought about fabric I had on hand and thought this black and gold from Waymaker Fabrics might be kind of cool.  It's not my kind of print but it seemed like something he'd wear.  

side view of a hoodie
The fabric is an athletic stretch, like you'd wear for leggings, so I wanted to line it to  make it a little warmer.  This kid lives in hoodies and tries to wear them as coats.  I had some thin waffle knit that I thought would be perfect because it's a little too thin to make a shirt out of but it would give a little warmth to this without making it too thick to sew.  
excited boy in hoodie

I cut the pieces out of the main fabric and the lining and then just sewed them together as thought it was one fabric.  I didn't want to go through the effort of sewing two hoodies and then sewing them together.  They stuck to each other pretty well, probably because it's winter and static is the name of the game around here in the winter months.  

The instructions were clear and easy to follow and I kind of guessed on the sizing.  At first, I felt like it would almost fit me and he's not that big, so I was afraid it would swim on him.  I think it's a pretty good fit and he seemed to like it!