Did you suffer through the high waisted, heavy denim jeans of the 90s? The button flys? Did they climb to your chin by the end of the day, like mine did on my 5’2” frame?
The rebellion to those, as we all can’t possibly forget, was the dawn of the 1 inch rise in the 2000s, where midriffs and far more were on display. I was pretty excited that someone lowered the height of the jeans waist, but it was short lived because no one wanted their muffin tops showing.
Enter stretch denim. My nemesis. I never minded the heavy denim in ye olden days, so as stretch denim has taken over, I’ve been less and less happy with ready to wear jeans. I find a pair that fits for a minute but after a few hours, they’ve stretched and I chase them for the rest of the day. And, I still find the rise to be too high for my tastes. And don’t even get me started on belts.
I made myself the Ginger Jeans in a stretch denim and they are just ok. I don’t love them. I don’t hate them. But I’ve never been excited to make a new pair. I need some alterations and it just gives me a headache to think about.
And then Meghann over at Halfmoon Atelier debuted her new Halfmoon 101 Jeans pattern. I was so excited because they sounded EXACTLY like the jeans of yore but with a reasonable rise that would not choke me by lunch time. And I loved how they looked on her.
I toyed with the idea of buying the pattern but again, the thought adjusting jeans just makes me want to cry, so I kept putting it off. I started seeing posts on Instagram where people said they made minimal changes and they looked pretty good, so I bit the bullet. And then I debated what to do about denim.
The man has a tendency to tear his jeans in the same spot getting into his truck, so I have amassed a collection of not all that stained jeans of his, waiting for a project like this. He’s a foot taller than me and twice my weight, but color me surprised when after dismantling his jeans, there wasn’t all that much extra fabric to play with. I was able to cut out what I needed, except for the waistband, from one pair.I knew the dark denim behind the pockets would be an issue for me on the pair I made, but I wasn’t worried because I planned to wear them as working in the yard/being at home jeans, anyway. I needed something real beyond the Muslin fabric (ALWAYS make a muslin ) so this would be perfect.
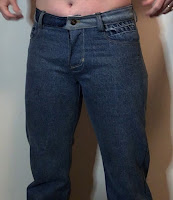
Due to every activity I’ve ever done requiring strong thighs, my thighs are full and always pose a problem with jeans. I didn’t want to go too high with the size because I was worried I’d have to make too many adjustments, so I went with the size most of my measurements fell into. The thighs were very snug and the crotch was unhappy so I added a quarter inch on each side of the front and back mid thigh to the crotch area and that seemed to be just enough.I’m not worried about the lines under my butt because these are jeans, not chinos and I know that over time, they will stretch anyway.
As you see, the former pocket marks are ridiculous for the eye as you look at the actual pockets on these jeans, so I would think twice before I’d up cycle jeans for real every day wear, for just this reason. You can also see here how the waistband is a very different color and personally, if the waistband would be a different color, I think it should be darker, not lighter! I’m not happy that my belt loop in the center back is slightly off center but it’s not worth undoing the waistband to fix it.
I made the insane loops design on my pockets freehand, and I really can’t explain myself.🤷🏽♀️ I also just realized the chalk is still there, but that should wash away soon. These were the original pockets, cut down to the pattern template. I kept the original top hem but top stitched the rest myself and the color is a little different, but no one will look that closely.
Speaking of washing away, I have started using Crayola washable markers for marking fabric and it has been a lifesaver. I did use chalk on some of this because the chalk showed well but sometimes chalk is impossible and those markers are a lifesaver!
I’m thrilled that the rise is below the belly button and for the first time ever, I don’t want to reduce the rise. I’ve never had a skirt, shorts, or pants that didn’t need a shorter rise so this is baffling to me! Also, there’s something a little strange with the zipper covering that I hope will straighten out with a washing. I’ve put in quite a few flys but I’ve never had that little loose situation happen like I see here.
Other than adding a little to the thighs, the only major adjustment I made was for the knee. I notice more and more that pants always pull when I bend my knee and recently discovered that knees might be placed lower than where mine is and thus, it pulls on my thigh. Meghann is so smart to actually show where the knee is on the front and back of the patterns, so I took advantage and moved mine up about 2.5 inches.
What a difference! I can bend my knees and I don’t feel any pull! The only drawback is that when I pulled the legs up, I didn’t add anything to the bottom, assuming I wouldn’t need to, but now I can’t hem this pair for it to be a normal length. That’s fine, but I will add a little for the next time so I can do a proper hem.
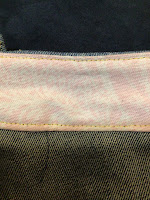
No jeans would be complete without pretty guts, so here are mine.The waistband is genius and I love how it topstitched. I chose to use something other than denim on the inside, more substantial than the pocket, but not quite as heavy as denim.
I also always put a little interfacing at the back pocket top corners due to expected wear and tear.


