Wednesday, February 2, 2022

The Savannah Blouse and Dress

I enjoy making knits and wearing them, but there comes a time when I need to wear something woven and more structured or I start to feel like I'm losing touch with reality.   Because, somehow, woven clothing resembles reality to me.  I can't explain it.

I'm a 5outof4patterns (affiliate link)  ambassador because I love how they create their patterns and how very little tinkering is involved to get them to fit.  Most of their patterns are for knits (affiliate link)  , which are very forgiving to sew, especially for beginners, so when the call came to test a woven pattern, I couldn't contain my excitement!  

The Savannah Blouse and Dress is exactly the kind of top and dress style I love and I hoped, hoped, hoped, that the excellent sizing that I love about their knits would be found in this woven pattern too.  

Spoiler alert:  it is!

If you don't know about pattern testing, here's what happens with the indie pattern companies that I have been using for a while.  Someone creates a pattern and makes many versions in their own size to get a demo model.  Some kind of magic is done through a computer program that takes that sizing and then expands it up and down the size ranges with whatever tweaks need to happen for the various sizes, shapes and options that will be available in the pattern.   The designer says "I need people to commit to making this pattern in a couple of variations to make sure everything is sized correctly, prints correctly and that the directions make sense and don't leave anything out."  Ideally, every size offered would be tested by at least one person, and every option (sleeves, lengths, etc.) would also be tried out in many ways.  The more it's tested before releasing to the public, the greater the chance that all of the kinks will be worked out.  It's also important to have lots of people reading through the steps to make sure they get the right results.  I've been part of tests where a specific thing just doesn't work and a major change has to happen and then we all try again.

For me, there are two hard parts in testing a pattern.  One, I am someone who wants to just get it done, so making a muslin or two or three before using my "real" fabric is very difficult for me.  I like the process and I understand it but I always want to be like here, now let me get on with it :)  It has really made me slow down my sewing process and actually look at things and figure out stuff that I would never have noticed otherwise.  The designer wants to see the muslins and suggest changes if necessary and then we should make those changes and show how it looks and wait for the go ahead.  Sometimes, there's a lot of waiting.

The other hard part is the fast pace, slow pace.  Usually, the designer says during the call for testers that there is a short turn around, usually a week.  There's a specific facebook group made just for that test and everyone is supposed to post regular pictures, comments, questions, etc.  As an aside, I once tested a pants pattern and I was constantly shocked at how much talk about crotches and pictures of crotches and underwear came up on that facebook page.  People go all out to test a pattern and don't care who sees what while trying to figure out how to make something fit their bodies.  

Anyway, knowing that unless it's summer, I don't have a lot of sewing time, I work out when I will be able to get to work on it in the timeframe we are given.  And sometimes, the answers to questions can't come immediately because they want others to weigh in and see if it's a common issue, or life gets in the way and I can't check as quickly as I want to or the designer can't, etc.  So it's "OMG  I have to get on this NOW" and then it's "Oh shoot, I can't make another move until this crucial question is answered because it could change the entire thing!"   And then it’s “oh yeah, you missed the 3 crucial changes we did yesterday so print it out again and start over “.  

Don't get me wrong, it's fun!  I wouldn't volunteer to test a pattern if I didn't like it or if I knew I wouldn't have time.  And sometimes, I know I would never wear that pattern in a million years so I know testing it wouldn't be worth anyone's time because I wouldn't be invested.

But, seeing the demo of the Savannah (affiliate link)  , I knew I would move mountains to test this baby!  The neckline does just what my neckline wants and there are slight gathers in the front. Before she even announced that there would be a dress option, I was already extending the blouse into a dress in my head because that's what I've done with every blouse pattern.  It's like a compulsion.  How nice that someone who knows what they are doing would have already done it for me!

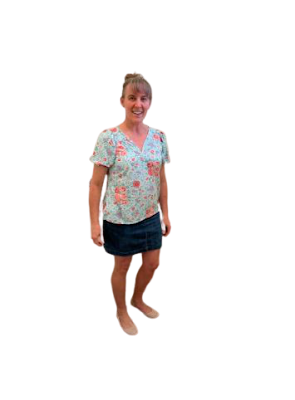
For the muslin of the top, I did a straight small.  The only alteration I made was to shorten through the bodice because my torso is so short.  I literally take up patterns 3-4 inches.  This was 3.5 inches and I added 1 inch back at the bottom.  I have zero space between my underarm and hip so I save a lot of fabric but I always have to shorten.

I was worrried that the hips might be a little more snug than I wanted after as I looked at the muslin, so I graded my final top out to a medium at the hips.  In revising the pattern to include the dress, she actually changed the width at the hips just enough that if I make the top again, I don't think I need to grade out to the medium at the hips.

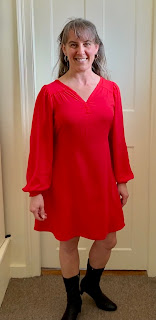
I chose the short puff sleeve for the top and the long puff sleeve for the dress.  I'm not sure what happened between the short and the long, but the width on these dress sleeves was so crazy to me, I had to bring them in 2 inches.  If I make long sleeves again, I would take out slightly more from the elbow to the wrist.   I feel like I could sail away!

The dress has ties and is very flowy.  At first, I wasn't going to use the ties, because I'm not much of a tied back dress person but I decided I should put them in.  When pattern testing, we really aren't supposed to go winging off and do our own thing and I figured if I hated them, I could remove them later.

There will be plenty of winging off in later iterations :)

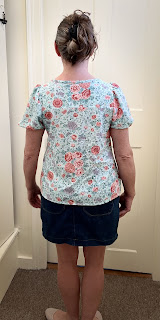
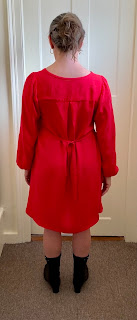
The dress has an added pleat at the back.  When I made the top, I kept
thinking the back was slightly wider than I probably needed due to my swayback and I think I have a narrow back anyway.  When I made the dress, I felt like the back was WAY too wide.  The pleat is fantastic to make the whole thing flow, but for me, it makes too much fabric at the back.  When I tie the ties, there's more bulk than I'd like in the back.  For my taste.  If I made it again, I would try using the width of the back that is meant for the shirt.  I really think it would be enough.


For me, the hardest part of this entire process is the placket and binding. For the top, the fabric is a
stretch chiffon that was like trying to sew water.  It's slippery and refuses to hold a crease.  I love the look of it but sewing with it is not fun.  I figured my issue with the binding was due to it not holding a crease and just being so slippery.

However, with the dress, the fabric is a rayon challis.  It's very smooth and drapey but not as slippery as the
chiffon.  And it hold a crease like you read about.  But I still really struggled with the binding.  It's not the directions.  I get what to do.  Translating into how the fabric comes out when topstitched just didn't happen the way I wanted.  In the pictures, it looks pretty good and to the general eye, nothing looks amiss.  But I know how it could look.  I've been thinking a lot about another way I could do it that might make it lay better on my next one.  My next one will not be a solid, for sure.

Here are a few tips I suggest when you make yours (affiliate link)  : 

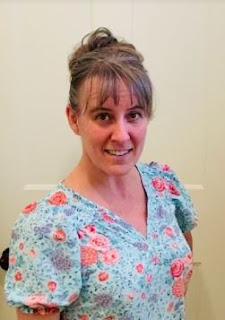
  • First, don't use a solid, especially in the bodice.  Several people did solid sleeves with a floral bodice.  Having some kind of print really helps mask any issues you might have with that binding.  
  • Second, if you like your sanity, choose a fabric that will hold a crease.  Hemming it and doing the binding will push you right over the edge if your fabric won't crease.  There was more silent swearing and screaming in my sewing room over that slippery chiffon than with any fabric I've sewn.
  • Third, choose a flowy, drapey fabric.  A heavy cotton or structured cotton (like for quilting) won't drape and would look stiff.  
  • Fourth, be ready to make many.  If the neckline looks good on you, you're going to want to make every sleeve length (and sleeveless) and both dresses and tops.  
Get ready for a slew of these tops and dresses in my feed. I think sleevless will be the name of the game as we head toward summer.

This pattern is on sale as it debuts this week.  Be sure to click my (affiliate link)  to get to the 5outof4patterns website and get this amazing pattern now!


Saturday, January 8, 2022

The Ellen PJ Bottoms

4 pajama bottoms on a clothesline

Why make one when you can make FOUR?  All of my pajama pants seemed to have fallen apart at once, so I replenished my arsenal with the Ellen Pajamas from 5outof4patterns (affiliate link).  The Ellen are part of the Clark, Ellen and Rusty PJs for the whole family.  I'm not much of a whole pajama kind of person, but I wear pajama bottoms every morning before I get ready.  The first two are flannel, followed by a batik I had left over from a quilt and a sheet I used in college that doesn't fit my bed anymore.  

pajama bottoms
Pajama pants that have a drawstring make me crazy because I don't like
tying and untying it every time I put them on but sometimes an elastic waist isn't snug enough with room in my hips/butt.  One of the features I like about the Ellen is the flat front with elastic in the back and no drawstring.  In the front, she suggests adding some elastic in the seam, not tight, but just enough to give it some stretch.  

I was surprised to see that the waist hits just about at my belly button which is about where I wear my pajama pants.  I was sure I was going to have to shorten the rise but I didn't in any of the pairs I made and I really like the fit.  I also really like that they don't sag way down in the crotch but somehow they also don't ride up when wearing them.  They stay pleasantly in place while being really roomy and comfortable.  The waist band has enough give to get over my butt but then stays where it belongs once they are on.

pajama pants pocket
I rarely sew a pattern exactly as intended but for this one, I followed the directions to the letter and included pockets as explained.  This pattern can be made with or without pockets.  I don't use pockets a lot in pajama pants but I guess I use them a little bit because I had a pair with no pockets and was constantly looking for them.  

I chose to serge the entire thing and do a lot of topstitching because I like the topstitching to hold everything in place.  It's recommended that you might want to run another line of stitching at the crotch for durability but the topstitching on the serged seams should do it for me.  And they are not at all snug, so there's no stress on the seams.

In addition to making no changes to the instructions, I also went with one size and no grading between sizes. I didn't find it necessary to blend two sizes for this pattern because it's designed to be easy wear.  I topstiched the pockets, the outer seams and the whole crotch seam.  The folded down waistband is also topstitched down.

rear view of pajamas
I have not made the Clark or the Rusty PJs so I can't vouch for the fit but if it's anything like the fit of the Ellen, they'd be great for the whole family!  Here's a view from the back, showing that they don't sag and they sort of flatter without being snug.  They are just so comfortable!

A word of caution.  I'm 5'2", so I was sure I could squeak these out of less fabric than suggested.  I tried every manner of fabric tetris with several pieces I had that I was sure would be big enough and I couldn't manage to get both front and back on grain out of my pieces.  I had the striped and batik on hand but I purchased the flannel specifically for these.  I went with 2 1/3 yards and used almost every bit of it.  Make sure you have the amount suggested for your size even if you're short and think you won't use it.  My inseams, finished, came to 29.5 inches and I folded a 1 inche hem twice.  If you're making pockets, you need to know that the pocket lining will show so keep that in mind when choosing your fabric, if that matters to you.

pajama pants waist
I struggled a little with the elastic for the back.  There's plenty of space for wide elastic if you want it.  I used 1 inch in one pair, 1.5 in another and the two flannel pair have "no roll" 1.5 inch elastic.  I hate the no roll elastic because it's extremely hard to work with (thus the no roll) but I have been wanting to use it up so I did here.  For me, I went shorter than the length of elastic recommended, which they say in the pattern to check.  I threaded it in and then safety pinned, tried them on and adjusted before finally sewing the elastic in.  The one thing I don't love about this pattern is the way the back waist fabric sort of floats around the elastic.  I enjoy the fit so much, it's fine, and these are PAJAMA pants that most people will never see me wearing so it's FINE.  Just a little of my persnickety-ness coming through.

As with every 5outof4pattern (affiliate link), I loved every step of the process.  The instrcutions are extremely clear, the PDF is awesome because the links are live and this pattern comes out exactly the way I hoped it would. I look at patterns through the Notability app on my ipad which keeps any live links live and lets me highlight or circle things I need to remember.  I can't imagine sewing any other way!  


Sunday, December 5, 2021

A Little Ditty ‘Bout Jack and Diane

Man standing with sweatshirt and pants
I don’t make a lot of clothes for the man, for a bunch of reasons, but one is that I’m worried the fit will be harder to get than it is on myself.  And he is bigger, so playing around with fabric to get just the right fit can be pricey and not worth the effort.  He also is particular about colors, so I don’t have a lot of solid fabric at hand to fool around with.

Last winter, he found some rtw jogger type pants that are basically wind pants and not very warm for his morning outdoor exercise.  I kept telling him to get some fleece lined pants but time marched on and then it was shorts season.  For a while, I’ve been seeing everyone making men’s joggers that look a lot like the rtw pants he had and I kept thinking I should make some, but finding a fleece backed fabric with enough stretch has been a challenge.  Until now.

I found some Poly Spandex Brushed Back Jersey Knit Fabric from the Fabric Fairy that is stretchy enough that I might even be able to make myself some leggings, but I started to toy with the idea of the Jack Joggers by 5outof4 patterns (affiliate link) for the purpose he wants to wear them.  The recommended fabric is a medium to heavy knit and not super stretchy.  I knew I wanted to taper the legs to make them more like what he already has and it needed some stretch to really move with him.

Man wearing pants
I made myself the Diane Joggers, also by 5outof4 patterns (affiliate link)  and didn’t love the patch pockets. It’s not my style.  Neither of us like pockets on the outside like that.  I made him one pair of Jack Joggers with no pockets at all and that was intolerable, so I got to thinking about using the side seam pockets from the Ruby Peacoat.  Putting them in was a breeze.  I didn’t change the size of the pocket at all and he can get his hand and phone in and out just fine.  

When I made the muslin, his only complaint was the floppy legs from the knee down.  He didn’t want the cuffs and he really likes the tapered legs of the rtw pair.  I used them as a guide on the pattern and finagled the lines enough to get them tapered enough to make him happy.

Man standing with pants
Most of his rtw athletic shorts and pants have elastic in the waist and a drawstring, so I did this with these too.  I used two inch knit elastic and I always like to zigzag at the top to keep the waistband from flipping around, so I did that with these as well.  I made two buttonholes in the center to add the drawstring.

He really likes the fabric and says they are warm.  The stretch is fantastic and the waistband stays in place.  For him, the pockets are just right.  These are SUPER easy to put together.  For me, the most time consuming part is the waistband because I’m picky about them.  I made several fit adjustments that came together much easier than for myself!  

Monday, October 11, 2021

The Ruby Peacoat- A Gem of A Pattern

Red winter coat, woman wearing it
As an ambassador with 5outof4patterns, (this post contains affiliate links) I publish something I  make each month from their patterns.  For October, I thought I’d give the Ruby Peacoat a whirl because it looked like a nice winter coat.  I knew right away I wanted the shawl collar and not the hood, and I knew I wanted the outer fabric to be something other than fleece.  I have my limits with fleece, looking at other people wearing it and wearing it myself, so I looked in the home dec section of the fabric store, thinking there might be something that would look nice for the outer fabric.

I found this red tweed, almost a brick red, and knew right away this would be a great color.   I knew that finding any kind of coating fabric locally would be impossible and I didn’t want to play games with fabric swatches from online companies, when I wasn’t really sure what something might be like.  I hadn’t given myself a lot of time to get this coat muslined, adjusted and then sewn up for October,

For the lining, I knew I wanted fleece and probably something fairly thick because the the tweed will give no protection from cold or wind.  With the ridiculously huge assortment of fleece options at Joann fabrics, I was shocked at how difficult it was to actually find what I was looking for.  Some were too thick, not smooth enough (I kept remembering I might want to wear a sweater under it and trying to imagine getting my sleeves in and out) and some textures didn’t have a color or print I liked,

I chose this red flowered fleece and spent the next few weeks questioning that decision.  For one, it’s fairly thick so I knew cutting it was going to be a challenge. I was pretty worried that it would not be flat enough to cut well and I’d have a poorly cut lining in what might be an already tricky project.  It actually cut really well, except for the fuzz.  Lesson learned- if I ever use this kind of fleece again, I will use a pinking blade on my rotary cutter.  I immediately serged all of the fleece pieces so I didn’t chase fuzz for the whole project and that really saved my sanity.

Another concern I had is the softness.  I’m one of those weird people who touches chenille and feels like it’s always wet.  This is a similar softness and I worried that I’d always feel like it’s wet.  So far, working with it, it doesn’t have that wet feeling.

The print  is a little loud and I knew I wanted to expose it on the shawl collar, and I thought maybe it would be juussssst enough. I think it is.  

The pattern is so much easier than I expected.  I am a pretty advanced sewstress, so I never let a pattern get the best of me, but because this is a coat, I kept thinking it would be outrageous.  It was a breeze and in many ways, it was far easier than some of the workout tanks I’ve made.  You basically make the same coat twice, sew it together and through some amazing magic, turn the whole thing out through the arm seam and everything is exactly where it should be.

The instructions are wonderful, and as always in a Digital 5outof4 pattern, there are links to each new thing you might want to add such as the hood or the collar, so you aren’t running through a pattern, trying to figure out what you do or don’t need to do.  There are videos that I did not use but I would imagine if the pictures and words don’t make things clear enough, you’d get what you’re missing from the video.

I chose the side seam pockets because I pretty much can’t stand any other kind of pocket for my coats.  They feel great (that fleece lining,) and they are spacious, but they give the coat a slightly bulkier look than I was hoping for.  I also completely forgot I had done them and when I first flipped the whole coat right side out, I felt these squishy thing near the hem and though I had left something inside the coat!

I’m very short through the torso, so most tops have to be shortened anywhere from 2-4 inches, depending on the pattern,  I took this one up 2 inches at the shorten/lengthen line and I’m glad I did.  The original length wasn’t bad but the pockets did feel slightly low and the whole thing looked a little loose.  Pulling it up these two inches out the pockets exactly where I wanted them.


Woman wearing red winter coat
I really struggled with the type of closure on this.  The coat, not this post 🤪 I knew I didn’t want big toggles and I thought I wanted big buttons like a typical peacoat.  Once I got it finished, I knew making those buttonholes was going to be quite a chore and I really worried about the fleece.  I decide to try magnetic snaps on the inside of the facings, with buttons on the outside just for decoration.  Other than forgetting the metal tabs on the inside were so close to the edge and breaking a needle on one as I topstitched the facing, I thought I loved them.  Wearing it in public was another story so out came all of those snaps and I sucked it up and did the buttonholes.  I’m much happier with it now.

It’s not cold enough in my neck of the woods to wear this regularly yet, so I haven’t had a chance to see how warm it is.  I think with that fleece lining, it should be really warm.  The one spot I’m worried about is that open neck.  I thought the shawl collar would pull in a little closer in the front when it’s buttoned, but it doesn’t.  A scarf should help with the cold air there.  UPDATE:  I read the pattern wrong and fixed it so the neck isn’t so gaping.  Pay attention to that part!

If you’ve been contemplating making your own coat for the winter, this pattern is a good one to try for your first attempt.  There are so many different options and things are so clearly spelled out, it seems like there’s something for everyone.  Here’s my affiliate link to go check out this pattern and many others!


Saturday, September 11, 2021

The Virgina Tank Hack

Virginia tank front view

This post contains affiliate links.  When I do yoga, I like a top that can be somewhat close fitting but also flowy, depending on the moves.  I've seen a lot of yoga tops that tie in the back and I tried a few patterns but they weren't quite right.  Then I saw Loni at www.havinsewmuchfun.com post something similar to the back I was looking for so I asked her how she did it.  It's a very simple hack, so I will share what I did, based on her suggestion.

I like the Virginia Tank by 5outof4 Patterns (affiliate link) so I took that pattern and adjusted it to make it a tie back.  Find your favorite tank pattern, or use the Virginia Tank like I did, and follow these steps.

You only need to adjust the back.  Most backs have one piece you cut on the fold. In order to make this work, you need to cut two pieces, not on the fold, so you'll have a back seam.   I did not add any seam allowance to mine because I serge it pretty closely, but you might want to calculate in some seam allowance if you think it will make a difference.


Pattern pieces for Virginia tank hack

Trace the pattern onto some paper that is longer than the current piece.  When you get to the bottom,
you're going to want to extend it so you'll have the tails.  I chose a length that seemed like it would let me have the tails to tie it back, but they wouldn't hang too long and be in the way.  The longer you go on the bottom point, the longer your tails will be.

If you look closely, I made a mark that says "sew to here".  You need to stop sewing to allow the tails to hang freely for future tying.  I found the spot on my back where I wanted the tie to sit and determined my stopping point there.   There's not a lot of math to this.  It's something you need to feel out for yourself.

Once I serge the back piece and stop at the indicated stopping point, then I treat the back as thought it were the original piece, cut on the fold.  I do not change the length of my neckband.  

Once I've sewn the front and back together and added the neck and arm bands, I do a narrow hem on the front and back and also up one tail, to the center of the back and down the other side.   

And that's it!  I don't tie it all that tight so when I want to release it if we are doing poses on our backs, it's easy to just untie before I lay on it.

I sometimes wear these tops on super hot days when I don't want anything confining and I don't tie it, I just let it flow.  Try it out and let me know how it goes!  


Sunday, April 11, 2021

Playing Carpenter in My Garden

I’m not a carpenter, but I do sew.  And there are many, many similarities in how both trades function.  The tools are some of the scariest differences and why I don’t normally pretend to be a carpenter.   Sometimes I can barely handle scissors so saws are not really my thing.   I’ve held many a board while it was cut or screwed in and I’ve had many cockamamie ideas that I’ve tried to have come to life through other peoples carpentry skills, so I do have some ideas about how wood and screws come together.

Homemade cage

This time, the man was too busy to help this one come to life and I knew enough of how I wanted it to look, that I thought maybe I could do it myself.  I knew this would involve cutting wood.  The man has a battery powered small circular saw that seems much safer  to me than a table saw or a skill saw, both of which get plugged in.  The battery powered one requires that you press two things at once when using it, so the second you dismember yourself, the remaining fingers will let go of anything and the saw will stop.  

Sounds safer, right?

I knew I wanted to make this out of strapping, which is not as thick as 2x4s, so easier to cut and deal with and lightweight.  And less expensive.  For this task, I didn’t need something highly durable.  I’m not trying to keep animals in or out.  Once we bought the bundle of strapping, I explained the bones of my idea to the man and he told me which screws would probably be best and off I went to the hardware store for screws, hinges and a latch.

Little did I realize that all of the hardware cloth (the metal stuff) that I thought I had at home had already been used last year in a project, so I would have to buy a bunch of that to complete this.  But that came later.

The first task was to get the frame done, which I did between work and dark one night.  The doors were a puzzle to me from the outset and I didn’t like any of the suggestions the man came up with.  This is about convenience.  I didn’t want to be lifting anything or making hatches that were going to need to be propped up if I opened them.  

The man also couldn’t picture how big this was going to be.  

At one point, he said I should make the top removable so I can just reach inside.  I still can’t stop laughing.  I can’t reach all the way inside with this on the ground, nevermind up on this raised bed.  I knew from the beginning it would be about 3 feet tall.  I’m still laughing.

The next day, I needed to get hardware cloth and as with pretty much everything I want, nowhere in my area had the size I wanted.  If you’d like to know the expensive way to do this, I’m your man.  Had I put some thought into that part of it and been a little patient, I would have ordered a roll and saved a lot of money but I had neither patience nor enough forethought.  

I did discover that there is 1/2 hardware cloth and 1/4 inch.  1/4 inch is what I knew would make this better, but the dimensions in 1/4 were less available than half inch.  The steam coming out of my ears as I did some math to decide the lesser of all evils could have powered a city.  As it was, I forgot how long 10 feet really is, so I ended up having to run out and get one more roll but in a different size because it was a different store.

Again, patience was not for me that day.

I went to bed that night with all but the doors completed.  I started looking online at how homemade doors look and it didn’t help much.  I asked the man for millionth time how I was going to do the doors.  He told me to think about it and then look the next day at what I’ve made and what I can do that would work.  For a second I thought he had become a teacher without my knowledge.  That’s a very teacher like suggestion and one I would definitely make to a whiny student who didn’t want to solve the puzzle herself.   Not the man’s typical behavior, but it worked.

I ended up finagling doors that open and close.  They are not completely straight and it makes me mad but I also didn’t use a tape measure for most of what I did so I won’t complain .

The only thing I haven’t figured out is a latch.  The one I bought won’t work because when the doors are closed and latched to each other, they open a little bit together.  I need to think about that some more.

So what is this?  A chicken coop?  Rabbit hutch?  Play yard for the cats?

It’s this year’s attempt to keep the cabbage moths away from my cabbage, kohlrabi, broccoli and whatever other brassica I manage to grow.  Last year’s farce didn’t work at all.  Every year, I get tons of them started only to have the caterpillars get the upper hand and I lose a lot.  

The cage is portable so I expect that another year it will be moved somewhere else so I can change what grows in that bed because I always rotate crops.  Most plants can’t be covered because they need pollinating but not the brassica family.

Brassica seedlings
Here are some of the babes that will get to live in the cage as soon as they are bigger.  There are kohlrabi and cabbage in this group.  

For the time and money that went into this, I hope it works!  

Not a single digit was lost, not a scrape to be had.

And there wasn’t even that much swearing.  Except when I had to “sew” some of the sections together with wire because I needed to do them in Pieces. There was a lot of swearing then!


Thursday, April 8, 2021

Ye Olde Outdoor Shower

Outdoor shower article

Today’s newspaper had this  article on the front page.  Clearly, it was a slow news day.  But it brought to mind the baffled expressions I’ve seen on people’s faces who don’t live  here, when I mention the outdoor shower.  People think it’s a joke, or they think it’s a ridiculous idea.  Sometimes, they think that because so many houses here are really old, it means we still have houses that don’t have indoor plumbing! I also think some people think it’s just a glorified hose so the water will be freezing,   I guess unless you have a lake house somewhere or live near the ocean, the idea of an outdoor shower seems peculiar  

Based one on of my non local friend’s refusal to take a shower in my outdoor shower, I think the biggest confusion is that people think they will be exposed.  Even though there’s a fence around it and you’re totally in seclusion, those who’ve never taken an outdoor shower fear they will be walked in on, seen from an upstairs window or spied on in some other way.  

I can’t 100% rule out any of those possibilities.  

We are near an airport, so small planes are constantly flying overhead.  If a passenger can identity my naked body in the shower from that height, I don’t even care.  Plus, most of my showers are at night so I can’t imagine being seen and identified  from a plane.

We do have upstairs windows and though we placed the shower 20 feet away from the house (most have them right next to the house) you could spy from upstairs.  

There is usually a door on an outdoor shower (we are in the process of redoing ours so the door is actually not there) but someone opening the door is always a possibility but highly unlikely in my yard.  

Most people who have outdoor showers say it’s so people can rinse off after going to the beach and no sand gets brought inside.  I completely agree with this and wonder why we never had one growing up.  With swimming lessons for many summers, I think my mother would have loved saying “get out of the car and go right to the outdoor shower and rinse off”.

We added an outdoor shower in the early 2000s and here’s what I can tell you about why it’s the best thing we’ve ever done:

1.  No steam in the bathroom to encourage mold.  Probably my #1 pleasure of having an outdoor shower.

2.  No soap scum to clean.  

3.  No long hair stuck on anything or clogging a drain- there’s no drain.  The floor is trek recycled decking and below is stone so the water spreads out and absorbs into the ground.

4.  Taking a shower in the sun is pretty great.

5.  Taking a shower in the dark, under the stars is pretty great.

6.  Taking a shower in the freezing cold but under hot water is spectacular.  This is a labor of love.  It’s not weather proof, so the water has to be shut off in the winter.  The man runs down cellar to turn it on and off each time he takes a shower in the winter.  Every. Single. Time.   That’s the worst part of a winter outdoor shower.  I will take one outside in the winter under two conditions:  there can’t be any wind and it has to be a day I wash my hair so I can put my head under the warm water.  Once fall arrives, my showers are mostly indoors again until evening temps are back to the 50s.  I will occasionally take one on a calm night in the winter but not every night, like the man does.

7.  Taking an outdoor shower on a hot day when the sun is out and then sitting in your towel for a minute in the patio while you dry is pretty spectacular.

8.  No worries about splashing water, flinging shampoo as you’re sudsing up, etc.  Imagine the joy of coming home from some kind of FILTHY job or activity and just going right to the outdoor shower to get undressed and shake the dirt out and then clean up before going inside.

9.  You might have a little frog friend that lives in your shower for a little while.  

10.  If you need to wash something with hot water but your sinks and bathtub aren’t going to work, the outdoor shower can handle it,  it’s my preferred way to wash the litter boxes.  Sometimes the hose isn’t enough because you need nice, hot water and the outdoor shower has that.

There are some drawbacks:

1.  They really aren’t legal.  If a building inspector comes, they can tell you to remove it.  I’m not sure anyone really would remove one or that a building inspector has really told anyone to remove them, but they aren’t technically allowed.  And there was one instance locally of a fire that supposedly started in an outdoor shower because a mirror caught the sun and started a fire.  Another reason not to have your shower right up against the house!

2.  Wind is a serious issue you’d never think of in an indoor shower.  Even on a warm night, wind can be a nuisance and spoil the joy.  Our shower happens to be in the most wind prone part of the yard and many a time I have thought it wasn’t windy only to get out there and have freezing gusts blow over me.  Wind also knocks over shampoo and soap bottles and extreme wind, which we have a lot, will scatter things all over the place.

3.  Bar soap is a tasty treat for mice and they will scratch at it and eat it if not covered.  We no longer use bar soap!  This has been the most bizarre discovery!

4.  Guests who aren’t used to outdoor showers think you’re weird.

5.  Bugs.  Anything that likes wet places will visit your outdoor shower, especially if it’s located in a damp area.  Ours gets sun for most of the day so it remains pretty dry but there have been a few hair raising spider encounters and I refuse to take an outdoor shower at night without a light on.  

That’s it.  The pros far outweigh the cons and I would advocate for outdoor showers forever.  We are currently doing a remodel of ours and it hasn’t been in use for a few months.  I’ve gotten so used to not taking a shower inside after another person has taken a shower inside, that when I enter a steamy bathroom after the man takes a shower, I can’t stand it!  Spring is here and the outdoor shower is calling.  We will have it redone by summer but I definitely would use it tonight if it was up to snuff.