Sunday, March 6, 2016

The Cheyenne Tunic, Take 1

With all of my venturing into knits, I haven't made myself a piece of clothing out of non-stretchy fabric for a really long time.  In fact, I'm not sure I can even tell you the last thing I made for myself that wasn't from a knit.

In high school and college, and a little after that, I made a lot of things for myself.  I didn't do any altering and most of the patterns were pretty frumpy and not very modern.  I figured out how to do some fancy things like button holes and darts, and I even managed to put boning in my prom dress,  but then I drifted away from clothing for a long time.

Thanks to instagram and the variety of people I follow who sew things, I have a renewed interest in making clothes.  Plus, a subscription to www.upcraftclub.com from my sister allows me to get $10 off a pattern each month, which is usually the cost of a pattern on that site, so I have broadened my horizons a little.

And the entertainment my sister gets from seeing the hijinks I create as I try to follow these patterns is far worth the cost of her subscription for me.

I made the Union St. Tee and the Sloan Leggings from Hey June Patterns, so I thought I'd try her Cheyenne Tunic.

I bought this fabric at a thrift store because a) it didn't have a bad smell and b) it was $2.5 for 2 yards.  I figured I'd use it in quilts somewhere along the line.  I knew it wasn't really something I would want for a piece of clothing, but I would find a use for it.

If you're trying a pattern for the first time, the catch phrase is "make a muslin".  This means you're making a test of the pattern so that if you need to make adjustments, you can figure out where.  Most people use fabric that they don't care much about or that didn't cost so much they'd cry if they made big mistakes and had to start over.  Some wear their muslins for real and some realize why we make muslins and make sure they never see the light of day.

Incidentally, when I'm typing "sew a muslin" in instagram, it helpfully insists that what I really mean is "see a Muslim".  So if you see a post of mine and I'm talking about seeing a Muslim, you definitely need to picture that I'm sewing.  It's not a secret code like "see a  man about a horse". 

Anyway, in the true style of muslin making, I thought this fabric would be perfect.  I thought 2 yards would be enough, even though the pattern said 3 yards, and I figured if I really needed that extra yard, I could add in something that would entertain me and ensure it would never leave the house.

Remember the episode of The Cosby Show when Denise makes Theo a shirt because she thinks she can sew and he thinks he will save money?


Throughout most of this project, I was pretty sure this would be me!

 Putting together the paper pattern, taping it and cutting it out, I then had to figure out how to get it onto the fabric correctly.  This isn't really a directional print, so matching lines wasn't an issue, so other than getting the grainline in the right direction, there wasn't much hassle in pinning it and cutting it.

Well, then there was the interfacing.  I thought I had a lot of interfacing stashed away, but it turned out I literally had just enough for everything I needed.

But, it wasn't iron-on interfacing because back when I bought it, I was even thriftier than I am now.  So, I took a page out of callajaire's book and glued the interfacing in place everywhere that it needed to be.

It held as it was meant to and you'd never know it wasn't ironed on.  And, in case you think interfacing is for sissies, I'm pretty sure all of the collars and cuffs would just flop without it and the buttonholes definitely need it.  So, you can't say "oh, I don't have interfacing, I'm sure it won't really matter.

Next time, I will definitely by iron-on just for the sake of saving time!

After transfering the markings and gluing in my interfacing, I had to sit down and actually start this thing!  Some people might read through all of the directions FIRST, to make sure they understand everything and aren't getting in over their heads.

I am not some people.

When it comes to sewing, headfirst I go, no prereading at all.

The first thing I did was make the pocket.  I figured if I could handle that, we'd be on a roll.  From the get go, I loved the finishing details, like the top stitching here on the pocket.  And I loved that seams get tucked under and covered by things, so everything gets a great finish.


She gives a great suggestion when stitching these triangles- count the number of stitches you do on the diagonal and try to repeat it on the other.  Very smart, if you read that piece of the directions BEFORE you sewed the first diagonal line.


The next thing that felt like a big accomplishment was the button placket.  I have a whole new respect for button down shirts.  To make the buttonhole placket and the piece that the buttons attach to on the other side involves a series of flipping the fabric.  In my usual half assed way, I completed the placket, top stitched both sides as it said to do, and made my first buttonhole.


I thought it was strange to make the buttonholes from the inside of the placket, but not doing much with buttonholes in the past 2 decades, I thought maybe someone had decided the look was better on the bobbin side of the buttonhole and that's what all of the cool kids are doing.

It's probably hard to tell here, unless you understand this process, but this placket is on completely opposite how it was intended to be.  This is in the INSIDE of the shirt, but it looks much prettier than the outside because I didn't do it right.


So, my seam ripper and I became acquaintances for the first of many times during this process.

Oh, I didn't tell you the best part.  Callajaire suggests (let me interrupt and say that I think it's hysterical that I am citing my sister and her "suggestions" like I'm writing a term paper) that when you make buttonholes and want them to look really polished and professional, you got through the whole process twice.  I agree, it really make a difference because the stitches are nice and thick and don't look homemade.

And that would have been fine, if I hadn't had to rip out that first buttonhole I did when the placket was on the wrong side.  A double buttonhole, if you will.

A lot of frustrated time later, I got the buttonhole all out, didn't rip the fabric, undid all of the topstitching on both plackets and did them all correctly.


I was really thrilled with the final result!

I am not one to really work through the details, but this pattern encourages it and I can't get over how good I think it makes the whole thing look.


From the collar, which has these tabs that stick out from the ends and then magically tuck inside when you turn the collar out...


To the detail at the wrist....

To the yoke detail  inside and out...


To the recommended topstitching at the shoulders...

 
To those fabulous French seams...


To the suggestion for the precision on the hem...


I think it all comes together extremely well to look like it should, and not like I made it with my eyes closed.


The only drawback to this pattern was that with all of those details, it was really hard to try it on and know how it would look during the process.  I want a dressmaker's form which I think would have helped.  The arm and side seams are done last, so for the entire process, I never really got a good look at how it would fit around my body because it was all open.  I could have basted or pinned it once just to see, but I wanted to see how all of the steps went in order.


The fit is OK, and good for a muslin, but I probably won't wear this.  I know exactly what I want to fix next time, which is add a little more to the width in the butt area so it's not pulling from my hips.  Most people probably don't notice, but I do and anyone who sews will see it, and really, it's tighter across my butt than I'd like.

I mean to wear this top with leggings, and in the pictures, I have thick fleece pants on.  They definitely add to the bulk around the butt area, but I think even with thin leggings, this shirt will feel better with a little more room in the hips.
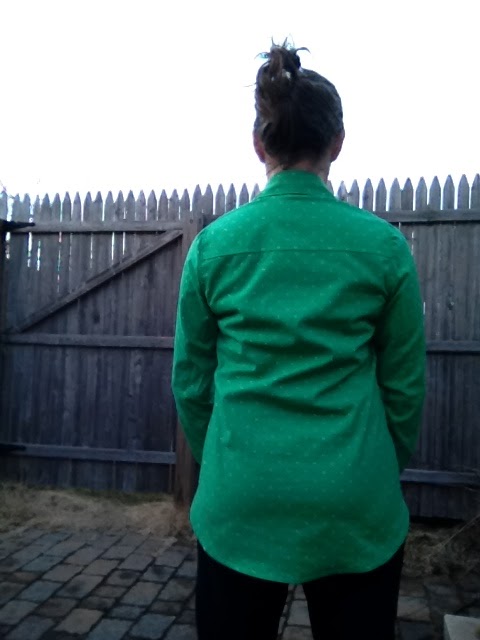


I love the freedom in the arms and I think the sleeves are a great length!   I have a serious problem with sleeves coming only to my wrist bone, so I like that these go a little too long and I have to fold them back a little.  I do this with most collared shirts.  Because that's just the way I am!


I didn't make any adjustments to this pattern and for the future, I think the only adjustment I'd make is in the hip area.  I don't know if I will go with a slightly narrower seam or if I will jump up a size to blend it with what I have.

Other than the disaster with the front plackets, I didn't have any other major disasters.  This is a pretty major accomplishment for me.  I did have a major pause when I did the wrist plackets.  Try as I might, I couldn't understand those directions, but I  knew what the finished product needed to look like, so I fiddled with it until I got it right.  Then I understood what the directions meant.

It's a good thing I don't have to read blueprints for a living!

This material was your typical cotton, more for quilting than wearing.  I'd like to make one in a soft doubt gauze or linen type of fabric.  With the interfacing and doubled yoke, a lighter fabric should hold up its shape pretty well.

And once again,the collar detail which was my favorite part!


Linking here:
http://www.the-chicken-chick.com/2016/03/clever-chicks-blog-hop-181-with-chubby.html
http://www.thesitsgirls.com
http://olives-n-okra.com/merry-monday-94/
http://www.julieslifestyle.blogspot.com/2016/03/cooking-and-crafting-with-j-j-41-and.html 
http://www.sewcando.com/2016/03/a-march-kickoff-craftastic-monday-link.html
http://www.skiptomylou.org/made-by-you-monday-279/http://www.skiptomylou.org/made-by-you-monday-279/
www.thesitsgirls.com
http://www.myturnforus.com/2016/03/freedom-fridays-with-all-my-bloggy_10.html 

Sunday, February 28, 2016

Selfish Sewing Week #4

Alas, the end of February means the end of the 4x7 Sewing Challenge from berrybarndesigns.  For the second year in a row, participating has accomplished two things:

a) it has really made me enjoy my sewing space and tackling some things I'd been putting off but always wanted to try

b) it has demonstrated yet again that I indeed have a severe case of ADD which is made far worse when I start to think about sewing.  Even as I am sitting at my machine, I've already got another thing cranking through my brain!

For example,  just this morning, as I was about to figure out which of about 5 things I wanted to do first, I found a GREAT tutorial for a scrap catcher for under my serger and had to seriously hold myself back from abandoning everything and working on that!

Being part of the challenge also keeps me accountable and makes me finish a task.  Sometimes, when I get aggravated, I abandon a project or make it half assed and never enjoy the finished look.  Knowing I have to post pictures makes me at least hide my half assed behavior a little more than usual!


So, I found a great fabric for the back of my Big City Quilt that I showed you here, but after a million washes and soaks, I almost threw it away.  That red would NOT stop running.  I did the salt water soak, the wash and dry it maneuver, the soak it a few more times chore and finally, the vinegar soak.  It finally seems to have stopped running, so I'm going to take a risk and use it.

I don't know why that red doesn't run into the white which kind of makes me feel like it might never have been an issue, but....

I didn't finish that quilt this week, but that wasn't really my goal anyway.  I wanted to have everything I need so that when the mood strikes, I will have batting and a backing.  It takes a lot of oomph to tackle quilting a quilt that size on my machine, and I keep thinking I am going to rearrange things so I have a bigger table in my sewing room which would make it all much easier.  But that will require moving a lot of things around and finding new places for a lot of things and I'm so not into that right now....

The next thing I thought I was going to work on this week was a block or two from this Farm Girl Vintage book.  I made the Wooly sheep and Penny pig blanket from this book (the pig was separate but from the same designer) and I like some of the other blocks.  The fruits and baking items aren't really my thing, but there are a few quilt blocks that I really like.


I got some fabrics ready but didn't actually make a plan because...


I needed new lingerie bags for the washer.  I buy these once in a while and I use them quite a bit.  They are great for bras so they don't hook everything in the wash, but also those little ped socks I wear with flats.  They tend to get caught up in everything and in my old washing machine, they were always getting under the rubber on the door frame.

These bags take a real beating and it seems like they've all died at once.

I kept thinking I could take out the zippers and make new bags but every time I went to Joann Fabrics, I couldn't find the right mesh.  I was beginning to think I might have to try using tulle, but I knew that would not work and would be a total mess.

The last time I was there, I asked the girl if she knew where I could find it and she said they have something like what you'd use in a butterfly net.  EXACTLY what I was looking for!  And in case you're wondering, it's near the canvas type materials.  In my Joann, anyway.


There wasn't a lot of precision involved in making these and I actually ended up making 3.  I loved that I could recycle the old zippers.  I just serged the seams with whatever was in my serger, which wasn't white, but who cares?

Next, I can't believe I did this, but I bought fabric for 3 more pairs of leggings!  I really like the Sloan Leggings by Hey June (in fact, I think I've made or altered  a pair every week of this challenge!) and I am determined to figure out which size is right for me!

I've now gone down two sizes and there's nowhere else to go!


I love this wide waistband, but even at the smallest size, it's a little loose at my waist.  BUT, this could be a matter of the fabric being thin and slippery.  I'd had my eye on some of the Nicole Miller slinky knits at Joann and with a 50% off coupon before they went on sale, I bought myself the 1.5 yards as required in the pattern.

I didn't realize until I put these on just how slippery the fabric is.  It's not very thick though I could have sworn it was in the store.  As I moved around, the waist sort of shifted.  They will probably be great for my spin classes, but probably not for running.

I think with a more substantial knit, this size might actually be too tight.  It's hard to know if the reason they are shifting is because they are too big, or they are snug and pulling the waist down as I move.  It's such a pain trying to make sure they will go over my butt but then snap back in to be at my low waist.

After the next two, I am sure I cannot make anymore for a while!  I'm going to make at least one of them capri length and then I need to be done.  I can't live my entire life in leggings or I'll become one of those people who can't wear real clothes anymore because they are too constricting!

Hey, did you know that when you cut out your printed PDF patterns, if you cut the right and top sides of every page, it will make your life 100 times easier?  And if you actually have a paper cutter, you will make your life 200 times easier.  It's something I never thought of and it's actually a suggestion printed in the Sloan Leggings pattern.


Genius.


Does this look familiar?


After I cut out my leggings, I looked at the leftover piece and thought I might have just enough for a tank top.  I used the Just A Tank pattern from Maria Denmark, which I've used for a few things.  In fact, my 4 dress sewing spree was made from this top which I extended down into a dress length.


I had exactly enough for the front and back piece and plenty for the bands.

None of these pictures actually shows what the fabric looks like!  There's a green in there and much more subtle color changes but you can't see any of that.

As leggings, I think this fabric is totally perfect and I would wear them to exercise. However, as a tank, I feel like it's way too fancy to wear to work out and I would only wear it as a nice top.  How ridiculous is that???

And speaking of ridiculous, in a million years, I would NEVER wear the top and leggings together in public.  I actually couldn't even do that in private. I couldn't live with myself.

So, in this month, I more than met the goals I set out to accomplish here!  I think, in course of this month, I've shown you just about every kind of sewing I might do, from horse blanket repairs to knits to quilting.  I'm really glad I got so much done and my  machines BOTH cooperated the entire time.  Last year, I had a major meltdown with my serger around the time of this challenge and it really made my life difficult because I was in the middle of a commissioned uniform job!

I think this was just the kick I needed to keep the pedal to the metal and continue working on the other things I've dreamed up while I've been sewing this month!

Linking here:
http://www.berrybarndesigns.com/
http://www.pluckys-secondthought.com/cooking-crafting-j-j-link-40-features/
http://www.sewcando.com/2016/02/its-craftastic-monday-link-party-time.html
http://www.the-chicken-chick.com/2016/02/clever-chicks-blog-hop-180-featuring.html\
http://www.skiptomylou.org/made-by-you-monday-278/
http://www.myturnforus.com/2016/02/freedom-fridays-with-all-my-bloggy_25.html 
http://olives-n-okra.com/merry-monday-93/
http://www.flamingotoes.com/2016/02/show-and-tell-link-party-50/

Wednesday, February 24, 2016

In Case Spring Returns

According to my last tomato picture on instagram, it's been 18 weeks since I picked tomatoes from my own garden.

That's really not that long ago.

And tomatoes are always the first to croak, so I know I picked other things after that, because we had pretty warm weather in November.


But I'm ready for spring to come again so I plant all of my seeds that just arrived!

I start all of my seeds myself, in the greenhouse.  I try to get organic or heirloom seeds as much as possible.  This means I have to order from catalogs because my local stores have limited options in the organic arena.

My flower seeds are not organic, and for that I feel bad.  BUT, I don't eat them (the squirrels won't let me get the sunflower seeds), and I can get them so much cheaper at a discount store here.  I worry that the seeds are not organic but everything I do is, so it must all balance out!

I grow zinnias because they are very easy for me to grow and they look great.  They also last right up to a hard frost, so in the fall, I can pick them and bring them in bouquets to school and they look great!

I'm trying a variety of sunflowers this year that Burpee has so nicely bundled into one seed packet.

The top flowers are Forget me Nots that my sister got in Alaska for me.  I don't think I know what they look like, so I'm looking forward to seeing what happens.


These are all varieties that I grew last year and which did really well for me.  The Shiraz tall top beets have been the best I've grown out of all the types I've tried.  The tops are nice and tall and the beets themselves are a good size and nice and dark, which I like.

I picked all of the peppers before they turned red because I prefer them green, but couldn't find a green pepper I wanted.  out of 10 seeds, 6 of them grew into really good plants.

THat rainbow radish pack was so much fun last year.  I went out one day and just about all of them were ready and it was like colored marbles in the containers!

Tomatoes are an issue because I specialize in some horrid disease that ruins every plant I try.  The two types of tomatoes here seem to resist it, so I'm trying it again!

And the Waltham butternut squash grew really well for me 2 years ago, but last year none of my squash did much.  I hope that was a one year anomaly!

These are all new varieties for me.  I've grown all of these vegetables, just not these specific types, so I'm looking forward to seeing what they will do.  There's a new type of tomato in there too.   Fingers crossed they will be fine.


These are mustard greens, a new type of squash for me and Chinese cabbage.  Sometimes I get excited to try new plants!

I also have seeds from last year that I will use because usually, they do fine for a couple of years.  

If you click this link to  Seeds Now, (affiliate link) you can use this promo code to save $3 on your order.  Or, click below and save 10% off your whole order.  Do the math and see what's better!

March 1st is just around the corner and I'm going to try my fate and plant some peas in the greenhouse.  I'll start them on heat  mats until the 20 degree nights go away.   I learned this fall that they are NOT frost tolerant, so I need to watch out for the first month because March is a tricky month.

But I'm just so ready to grow things again!!


Linking here:
http://www.myturnforus.com/2016/02/freedom-fridays-with-all-my-bloggy_25.html
http://olives-n-okra.com/funtastic-friday-63/
http://www.thesitsgirls.com 

Sunday, February 21, 2016

Selfish Sewing Week #3

Is it really true that we've already completed 3 weeks of the 4x7 Sewing Challenge from berrybarndesigns?  Where is this most dismal month going??

I am not a fan of February with its cold days that are still mostly bleak and end too early.  Doing the 4x7 challenge really gives some pep to the month for me.  And since I have school vacation in the middle of February, I get to put in a lot of sewing hours, inspired by the challenge.

This year's challenge has me focused on many of the sewing projects I've had buzzing in my head for a long time.  I'm not sure what the difference is this year, but I will say that I've finally figured out which hours get the best sunlight and therefore warmth in my sewing room this time of year, so I've been waiting to go and sew until that time. 

It's far more pleasant than trying to sew while debating whether to turn up the heat.

This week, I made another pair of Sloan Leggings by Hey June and I really like them.  I wore them for an entire day and then taught a spinning class in them, not sure if they'd actually stay in place.  Other than realizing I looked like a smurf, I was really happy with them.  They did shift a little, but they are definitely fine and I'm inspired to make more when I find the right fabric.

I'm also going to go down one more size, which should definitely keep them in place.

I poked around on instagram and saw lots of variations in length, including shorts.  Sloan Leggings and I are not ready to part ways yet!

Last week, I made the Union St. Tee, also by Hey June and I wore it one day this week, but quickly realized I was annoyed by the too short sleeves.  They seemed plenty long enough, but as I moved throughout the day, they kept creeping up past my wrist which I can't stand!   I lengthened them and then washed it and was pleased to see that there is no sign of pilling yet!

I thought I might make a short sleeve version of this top but I didn't have the fabric I thought I had, so I've put that on hold for now.  I have one knit that I got as a remnant that I thought I liked, but it's got a sueded feel on one side which kind of reminds me of the texture of microfiber and I cannot bear that texture.  My dry winter hands catch on it, so microfiber cloths are banned from my house.

I need to spend more time touching this fabric to decide what I think.

I made this red Big City quilt top over the summer, after I made this one.  I've always been obsessed with red and white quilts and I really like the Big City pattern.  Continuing my year of using my stash, I used all pieces I had for the reds in this quilt.

After I finished the top, I wasn't thrilled with it anymore.  I can't really explain why I don't like it, but I'm over it.  If I were to do it again for myself, I would only use one red fabric throughout.  I used a bunch of different reds, some with prints and some without and it's just not my thing.  It's a great pattern that goes together so easily, so it's something I will make again, but maybe not in reds.

This week, I came to terms with deciding to back it and quilt it and put it in my etsy store.  I recently sold the Queen of Hearts quilt, so I'm inspired to get this one done and see if I get the same results.


This backing fabric and I had a big disagreement this week.  I really love it, but as with many reds, it would not stop running.  I had a bright red koolaid effect after the first two soaks, so I tried soaking it in salt water, with a lot of salt.  It was better but not much.


I even put it in the wash on hot, hoping it would run itself to death and then I dried it in the drier, hoping that would set it.

Nope.

My last resort, after another salt water soak was a vinegar soak and that seemed to do the trick.

Although there will be a BIG warning not to ever wash this quilt in hot water!!

This was a week of finishing things, fixing things and planning out things.  I made several trips to Joann fabrics and actually made one to a thrift store and scored a huge 2.5 yard piece of cotton that didn't smell and a bag of threads for 50 cents.  I was totally shocked to find either and to get out of there for less than $5 was really exciting.  SOme of the thread is crapola but there's some newer Dual Duty that will serve me just fine.


I've had this pair of fleece pants forever, like since Lerner was a store in our mall.  I think it's gone from everywhere but definitely from our mall.

The waist is flat, wide elastic and over time, has stretched out.  The pants are still fine, so finally this week, I decided I couldn't keep pulling them up anymore and I inserted an elastic band.  How weird is it that I found  one cut to exactly the size I wanted?  I have no idea how that happened but I think it was left over from something else I did a while back.  The channel for the elastic was already there, just never tacked down, so I zigzagged it down and put the elastic through.  I LOVE the way they fit now and there's no worry about them sliding down.

But they are fleece and it's dry here, so I'm a walking static bomb and everything sticks to it.  These pants are only for keeping warm after exercising, not for wearing to school.


I suddenly have an obsession with these two colors together and I'm possibly planning some quilt squares in my head featuring these colors.  The green is a minty/light teal color that is very specific but hard to describe.  The pieces I have here are left over from the Cars quilt I made a few years ago, and I have two fat quarters that I got on clearance ages ago and had totally forgotten about.  The pinks are still from my stash.

I don't think I have enough to make a whole quilt, so I have to think about what I want to do.  But I need to put these colors together and see what happens!  I spent a lot of time collecting all of the pinks I have and deciding which can stay and which  need to go.


I also had to take apart some left over pieces that I threw into the scrap drawer intact.  That took some time, but I really wanted some of the pinks in there, and now they are all separate.

It's been a great week for trying out some things and getting started on some projects that have been on the back burner.

Linking here:
http://www.berrybarndesigns.com/blog/4x7-sewing-challenge-week-3-progress
http://olives-n-okra.com/merry-monday-92/
http://www.the-chicken-chick.com/2016/02/clever-chicks-blog-hop-179-featuring.html
http://www.sewcando.com
http://www.skiptomylou.org/made-by-you-monday-277/
http://www.julieslifestyle.blogspot.com/2016/02/cooking-and-crafting-with-j-j-39-and.html#.VsueYuarErg 
http://www.flamingotoes.com/2016/02/show-and-tell-link-party-49/

Thursday, February 18, 2016

Because One Pair of Sloan Leggings Isn't Enough

As I mentioned here, I made a pair of Sloan Leggings by Hey June as part of my 4x7 Sewing Challenge goal.  I've been suspicious of making leggings because, even with my serger, I was convinced that I'd get them just right and then wear them and they'd pop all over the place and I'd end up with holes in every seam.

Or, that the fabric wouldn't really stretch in the right places so I'd get holes in the fabric, or they'd be too snug and you'd see right through them.

I'm not Lululemon here, I like knits that you can't see through.

Or that they'd cut into my knees or waist.

I also worried they'd bag at the knees and I'd be fighting with them all the time.

Can you tell I've had unpleasant leggings experiences over the years?  I've worn leggings and capris that have done just about all of that.

The first pair I made were a black fabric that I had forgotten about.  I picked it up in the remnant rack at Joann Fabrics, back when I always underestimated just how much fabric I would really need to make anything.

I have no idea what it is, but it's got 4-way stretch and then some and it feels so soft.  Not slippery polyester soft, but that soft cottony feeling that you get with some knits.

And remnants are never over a yard, so I have no idea how I had enough to make these.

I made the medium because that's what my measurements called for and remember, I was super worried about exploding the seams.  It's my butt and hips that worry me.  Recently, I bought some yoga pants that had nice wide waists like this and still, every time I put them on, there are popping noises happening somewhere.  I see no holes, so it's a mystery.  Getting the waistband over them without incident was of real concern. 

Especially when I used the interfacing.  I hate reading things in great detail online and as usual, I completely skipped the part that explained to use an interfacing with stretch.  I used any old interfacing that I had for the waistband, which seemed completely counter to the point of using a knit fabric.  Even as I sewed it in (right, I didn't even have a fusible, incorrect interfacing, I had to sew it in!) and sewed the waistbands, I kept thinking it was so strange that the part of the pants that need the most stretch have now been stabilized beyond belief.

And then I reread it and found some stretchy interfacing and things got a lot better.

On my first try, even with the stupid non-stretch interfacing, I knew the waistband was too big to sit comfortably on my waist.  So, printed out just the waistband in small removed the medium band with the bad interfacing and used the proper kind and attached the small waistband to the medium pants.

I didn't take a picture because I'm not thrilled with how high they are.  They sit way up on my ribs.  They are totally wearable and extremely comfortable, so they will be worn, but they are not the best example of these leggings.

I toyed with the idea of trying to shorten the rise in the front and back for the next pair, but then I thought maybe the small would be a better choice.  I put the medium and small patterns together and saw that the rise was just a little smaller in the small, so maybe that would make the difference.  I love PDF patterns that you can just print and reprint!

Warning, several shots of these leggings doing exactly what leggings are meant to do follow:


They are super stretchy and the small is definitely not too small in any place, including the waistband.  I used the stretchy interfacing again, but as with the black pair, something is strange about its connection to the knit and there's a mysterious puckering, which you can't really see here.  It's not a problem with the pattern, it's either the knit, the interfacing or the seamstress.

No binding or cutting into me and they are not at all see through.


I like all of my waistbands to sit below my belly button.  The shorter the rise, the better for me, as long as the butt rise is high enough.  I almost feel like this waistband could go one size smaller, even.  There's no trouble getting it over my butt and hips.  I'll leave this one in because they are definitely something I will wear a lot.

If I make them again, I might think about a smaller waistband.


I hemmed them with my newfound zigzag stitch that lets me get my feet in without popping the seams.  They are not quite as snug at the ankle as commercial leggings even though I took them in about a half inch from the knee down.  I'm not sure if this indicates a need to make them petite next time or shorten them somewhere in the knee area.

My question about whether to make more is about finding the fabric that I want.  At first, I thought I'd make them in all of the crazy stretchy patterns I see, but those fabrics mostly feel slippery and sweaty to me, which is not what I want.  This material is similar to the black with its soft cottony feel and tons and tons of stretch.

I thought I wanted to make fun leggings but really, I just want them in solid colors that won't pill.  There wasn't another color of this particular fabric in the store, go figure.

These leggings are ridiculously fast to make and have 4 seams:  front rise, back rise, inseam and waistband attachment to the pants.

If this material holds up over wearing and washing a lot, I'll definitely make them again!

Linking here:
 http://www.thesitsgirls.com 
http://www.myturnforus.com/2016/02/freedom-fridays-with-all-my-bloggy_18.html
http://olives-n-okra.com/funtastic-friday-62/